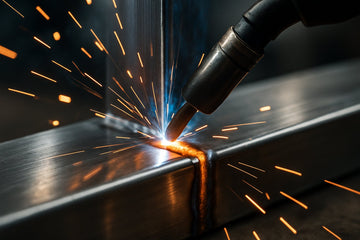
Welding joints are the spots where two or more metal or plastic parts are joined together by welding. Per AWS standards, there are five main types: butt joint, lap joint, tee joint, corner joint, and edge joint. Welders choose each type depending on how strong the join must be, the geometry of parts, and structural needs.
Knowing about these joints helps you pick the right welding process, like arc welding or melt-through welds, and can help you avoid issues like porosity that weaken your work.
By picking the right joint and welding method, you can work smarter and end up with safer, more durable results.
What Are Welding Joints?
A welding joint is the exact spot where two metal pieces come together for welding. This is where you apply heat and filler metal to join them into one solid piece.
The pieces can meet end to end (butt joints), overlap (lap joints), or come together at angles (tee joints and corner joints).
Each joint type changes how the metals fuse and how the weld looks. For example, a butt joint lines up flat, making it easier to weld thick parts or pipes.
Knowing these joint types helps you pick the right one before you even start welding.
Why Joint Design Affects Strength, Cost, And Fit
How you design a welding joint decides how strong the final piece will be. A strong joint holds up better under stress, while a weak one can break or deform.
For instance, a well-prepared butt joint with the right groove shape can handle higher forces than an edge joint. Joint design also affects cost.
Some joints need more filler metal or longer welding time. Lap joints, for example, might need welding on both sides, which takes more time and materials.
Good design helps cut waste and labor costs. Proper joint design also makes sure your metals fit together well.
Poor fit can cause gaps or weak spots in the weld. Planning the right welding joint type and shape helps your work stay strong, affordable, and precise.
The Five Basic Welding Joints

Picking the right welding joint is key to creating strong, lasting connections. Different joints give you options for how to join pieces based on shape, stress, and the strength you need.
Each has unique uses and welding techniques. Some are just easier to work with, honestly.
Butt Joint: Edge-To-Edge Groove Welds For Pipes & Plates
A butt joint connects two pieces of metal edge to edge, usually in the same flat plane. It’s common for welding pipes, plates, or tubing where you want a smooth, flush finish.
The edges might be square, beveled, or have a groove like a V or U for deeper weld penetration. You’ll often use groove welds on butt joints to get strong fusion across thicker materials.
Beveled edges take more prep but create stronger welds. For thinner materials—under 1/8 inch—square edges without bevels work well.
You might leave a small root opening or close the edges to control weld penetration. Fit-up or alignment really matters here.
If the edges don’t line up or there are gaps, the weld can turn out weak. Butt joints give you good strength when done right, so they’re popular in construction and industrial work.
Tee Joint: T‑Shaped, Fillet Weld In Fabrication
A tee joint forms a T shape, where the edge of one piece joins to the flat surface of another at about 90 degrees. This joint is often welded with a fillet weld, which is quick and doesn’t need much edge prep.
Tee joints show up everywhere—frames, machinery, structural steel. You can weld them from one or both sides, depending on how much stress the joint will face.
Welding both sides increases strength and helps avoid failures if the load comes from different directions. For best results, put your weld at a 45-degree angle to reach both members properly.
Tee joints often require little surface prep, which saves time. They also let you weld in different positions—flat, vertical, horizontal, or even overhead if you’re feeling brave.
Corner Joint: L‑Shaped, Fillet Or Groove Style Welds
Corner joints join two pieces at a right angle to make an L shape. You can use a fillet weld on the outside edge or a groove weld if you bevel the edges.
These are common in frames, boxes, or any part needing a sharp corner. Corner joints are easy to set up and usually need little edge prep.
If the joint is “open,” you see a V shape and might need more weld metal to fill it. A “closed” corner has the pieces flush against each other.
You’ll want the angle to stay square before and after welding to prevent warping. If you’re working with thin metal, weld quickly to avoid burning through the edges.
Using a jig helps keep the joint square during welding. Corner joints balance good strength with a neat look, especially on smaller or medium-thickness materials.
Lap Joint: Overlapping Sheets Or Parts With Fillet Welds
Lap joints happen when one metal piece overlaps another. You weld the overlapping edge with fillet welds, often on one or both sides.
This joint is strong and common for sheet metal, patching, or vehicle parts. You’ll want the pieces to be flush with no gaps before welding.
Thicker materials need more overlap for strength. When welding thin metal, lower your amperage and move faster to avoid burning through or warping the metal.
Lap joints aren’t flush like butt joints but can be more durable under stress. If you weld both sides, you add rigidity.
Lap welds are popular where overlap and extra strength matter more than appearance.
Edge Joint: Edges Aligned, Used In Seam Or Spot Welding
Edge joints join pieces when their edges are parallel or nearly so. You’ll mostly see these for parts that don’t have high stress or impact, like in seam or spot welding.
Preparing edges by grinding or cutting grooves helps weld penetration. Edge joints can have different groove shapes—square, V, J, or U—depending on what you need.
You might weld all sides for extra strength if it’s needed. This type shows up a lot on thinner material or less stressed sections.
Since edge joints are less strong, don’t use them where structural strength is critical. If you care about looks, you might need to grind the weld flush after.
They work best for light-duty bonds, not load-bearing ones.
Specialized skills can lead to rewarding careers. Find out how in Pipeline Welding: How to Become a Pipeline Welder.
Tips To Improve Weld Joint Quality

To get strong, clean weld joints, focus on how you prep the metal edges and control the size and heat of your weld beads. Paying attention to these details helps avoid weak spots and defects that can cause headaches later.
Edge Prep, Fit-Up, And Gap Control For Butt Joints
For butt welding, start with clean, smooth edges. Remove rust, dirt, and irregularities that could cause poor fusion.
Use grinders or beveling machines to make a good weld groove. Fit-up means aligning the parts well before welding.
Make sure the edges meet evenly, with no twisting or gaps. A tight fit helps the weld penetrate evenly across the joint.
Controlling the gap between the parts is key. If the gap’s too wide, the weld might not hold well. If it’s too tight, gas can get trapped and cause porosity.
Generally, a gap of 1/16 to 1/8 inches works for most butt welds. This balance lets the weld flow smoothly and creates a solid joint.
Bead Size, Heat Control, And Layered Welding For Fillets
When welding fillet joints, like lap or tee joints, bead size affects both look and strength. Your beads should be wide enough to cover the joint without building up too much or cutting into the metal.
Aim for a smooth, even bead with about 1 to 1.5 times the leg length of the joint. Heat control is crucial.
Too much heat can warp and weaken the joint. Too little heat means poor fusion. Adjust your welding machine to match the metal’s thickness and type.
For thicker joints, use layered welding. Apply multiple passes, letting each cool a bit before adding the next.
This method controls distortion and improves strength by reducing stress inside the weld. Focus on these details, and your fillet welds will be clean, strong, and ready for whatever you throw at them.
Best ArcCaptain Welders for Common Welding Joints
Choosing the right welding machine is just as important as choosing the right joint design. Below are three ArcCaptain models that cover nearly every joint type and skill level.
ArcCaptain MIG200 Multi‑Process Welder – The Do‑It‑All Workhorse

- MIG, FCAW, Stick, and Lift‑TIG in one unit, so you can run fillet welds on tee joints or lay smooth groove beads on butt joints without swapping machines.
- Simple menu cycling and a bright LED display speed up setup—perfect when you’re jumping between joint types in the same project.
ArcCaptain ARC205 Pro Stick Welder – Muscle for Thick Tee & Corner Joints

- Dual‑voltage (120/230 V) stick unit with Lift‑TIG mode; delivers a stable arc that bites deep into structural tee and corner joints.
- MCU‑controlled “SYN” function auto‑adjusts current to minimize spatter, keeping lap‑joint fillets cleaner.
ArcCaptain MIG205MP Combo – Weld and prep in Pne Station

- Adds a built‑in plasma cutter, so you can bevel edges for V‑groove butt joints before you strike an arc.
- MIG/TIG/Stick flexibility means you can tackle everything from sheet‑metal lap joints to U‑groove welds on thick plate without extra gear.
Pro tip: Match machine duty cycle to the amperage you’ll run most often. For long runs on heavy corner or butt joints, bump up one model so you’re not pushing the welder to 100 % duty cycle all day.
Gear up by visiting ArcCaptain to compare specs, see real‑world demo videos, and grab current bundle deals on these welders and accessories.
Choosing the right approach makes a big difference in your results. Discover the details in Uphill vs Downhill Welding.
Advanced & Specialized Joints
When you’re working with thick or complex materials, certain welding joints just make more sense. These joints often use special shapes and configurations to handle heavy loads, tricky angles, or specific manufacturing needs.
Knowing these designs helps you choose the right joint for the job—even if it takes a little extra planning or skill.
Groove Variants: V, U, J For Thick Materials
Groove welds like V, U, and J are designed for thick metals. You use V-groove welds when the edges are beveled into a “V” shape.
This type gives you good penetration. It also makes welding thicker plates a bit easier, honestly.
The U-groove weld has a curved groove, not a sharp angle. It cuts down on filler material and lowers the risk of cracking.
U-grooves work well when you want full penetration without a ton of prep work. Sometimes, that's a real time-saver.
J-groove welds have one straight and one curved edge. They're handy when prepping or accessing one side of the joint is a pain.
These groove types focus on strength and heat control. That helps stop warping in thick parts, which is always a headache.
Plug, Slot, Seam, And Spot Joints For Specialized Tasks
Specialized joints like plug, slot, seam, and spot welds shine when you join thin sheets or want quick, clean welds.
A plug weld happens when you fill a hole in one piece that overlaps another. No need for fancy edge prep here.
Slot welds use an elongated hole instead of a round one. This gives you more weld surface, so the hold is better.
Seam welds join edges in long, continuous lines. People often use them for tanks or pipes where leaks just aren’t an option.
These welds need steady hands to avoid weak spots. Not always easy, but worth it.
Spot welds join overlapping sheets at specific points. They’re common in car bodies and appliances for quick, precise connections without much metal distortion.
Quality results start with the right equipment. Check out our metal welders collection for top machines and tools.
Frequently Asked Questions
What is 1G, 2G, 3G, 4G, 5G, 6G welding position?
These numbers and letters describe welding positions based on the angle and orientation of the joint.
- 1G: Welding in a flat position with the weld on top.
- 2G: Horizontal welding with the joint held vertically.
- 3G: Vertical welding, either up or down.
- 4G: Overhead welding position.
- 5G: Pipe fixed horizontally, and you weld all around the joint.
- 6G: Pipe fixed at a 45-degree angle. This one tests welders since it combines multiple positions.
How do you perform welding on an edge joint effectively?
To weld an edge joint well, get good access to the edges of two parallel metal pieces. Clean and sometimes bevel the edges, depending on how thick they are.
Pick the right welding method—fillet or groove—based on how strong you need it. Control the heat so you don't burn through or warp thin materials. Keep your weld bead steady and make sure you get good penetration to avoid cracks or weak spots.
What are the basic 5 hinge joints?
Hinge joints in welding usually mean common ways metal parts connect so they can move or rotate.
The five basic types are:
- Butt joint
- Lap joint
- Tee joint
- Corner joint
- Edge joint
These joints are the foundation for a lot of welded structures, especially if you need some movement or a certain alignment.
In what scenarios is a lap joint preferred in welding practices?
You’ll usually pick a lap joint when you need to join thin metals, or if the pieces have different thicknesses. It’s just simpler to fit and weld since you can overlap the parts instead of lining them up edge-to-edge.
Lap joints come in handy for sheet metal work, automotive body panels, and even HVAC ducts. They give you more surface area for the weld, which can help spread out the load a bit.
But, they’re not always the strongest choice for heavy loads. And honestly, you’ll want to keep an eye out for corrosion sneaking in where the metal overlaps.