
Installing a 220V outlet for your new ARCCAPTAIN Welder is one of the first steps to unlocking true industrial power. While standard 110V outlets are fine for light work, 220V allows you to weld thicker steel with a smoother, hotter arc.
However, 220V wiring confuses many DIYers because it uses a different plug standard than your dryer or stove. In this guide, we provide the definitive 3-Wire 220V Welder Plug Wiring Diagram for the industry-standard NEMA 6-50 plug.
220V electricity is lethal. Always turn off the main breaker at your panel before opening any outlets or wiring any plugs. If you are unsure, hire a licensed electrician.
The Standard: What is a NEMA 6-50?
Most 3-prong welder plugs in North America use the NEMA 6-50 configuration. Unlike a dryer plug (which often has 4 wires), a welder plug only needs 3 wires:
- Two "Hot" Wires: To carry the 240 Volts.
- One "Ground" Wire: For safety.
- No Neutral: Welders do not need a neutral wire because they don't run 110V timers or lights inside them.
(Ground)
(Hot #1)
(Hot #2)
Looking at the face of the plug (Pins facing you)
Wiring Color Code Chart
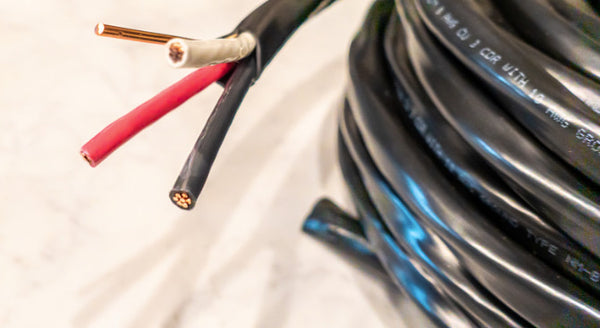
If you are using standard 10/2 (with ground) or 8/2 (with ground) Romex wire, here is exactly where each wire goes:
| Wire Color | Function | Connects To (Plug Terminal) |
|---|---|---|
| Bare Copper or Green | Ground (Safety) | Green Screw (Top Round Pin) |
| Black | Hot #1 (120V) | Brass/Gold Screw (Left Blade) |
| White* | Hot #2 (120V) | Brass/Gold Screw (Right Blade) |
*Note: In a 220V welder circuit using standard cable, the White wire is used as a HOT wire, not a neutral. You should wrap electrical tape (black or red) around the end of the white wire to indicate it is "Hot".
Understanding 220v Welder Plug Wiring
A 220v welder plug is a type of electrical plug that is used to power a welder. It is called a 220v plug because it is designed to handle 220 volts of electrical power.
The 3-wire configuration is used because it provides the necessary grounding for the welder. The ground wire is an important safety feature that helps prevent electrical shock. It is essential to ensure that the wiring is done correctly to avoid any potential safety hazards.
Different Types of 220v Welder Plugs
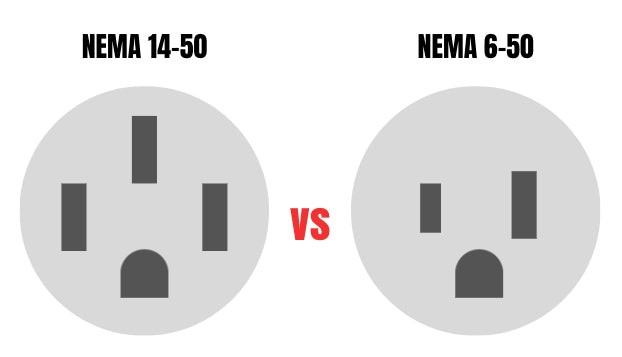
There are different types of 220v welder plugs, and it is crucial to use the correct one for your welder. The most common types are NEMA 6-50 and NEMA 14-50.
- The NEMA 6-50 plug has three prongs, while the NEMA 14-50 plug has four prongs.
- The NEMA 14-50 plug is a newer design that includes a neutral wire, which is not required for most welders.
When wiring a 220v welder plug, it is essential to follow the correct setup. The wiring diagram for a 3-wire 220v welder plug is relatively simple.
The black and red wires are the hot wires, and the green wire is the ground wire. The black and red wires are connected to the two hot prongs on the plug, while the green wire is connected to the ground prong.
Tools and Materials Needed for Wiring a 3 Wire 220v Welder Plug
When it comes to wiring a 3-wire 220v welder plug, you need to have the right tools and materials to get the job done right. Here are some of the essential items you will need:
Tools
- Screwdriver
- Wire stripper
- Crimper
- Voltage tester
- Pliers
- Safety glasses
- Work gloves
Materials
- 3 wire 220v welder plug
- 10 or 8 gauge wire (depending on the amperage of the welder)
- Ring lugs (if needed)
- Electrical tape
- Wire nuts
It's important to note that safety should always be a top priority when working with electricity. Make sure to wear safety glasses and work gloves to protect yourself from any potential hazards.
When selecting the wire gauge for your 3 wire 220v welder plug, it's essential to choose the right size based on the amperage of your welder. A 10 gauge wire is suitable for welders with an amperage of up to 30 amps, while an 8 gauge wire is necessary for welders with an amperage of up to 50 amps.
In addition to the tools and materials listed above, you may also need to purchase additional items such as conduits, junction boxes, or cable connectors, depending on the specifics of your wiring project.
Safety Precautions for Wiring a 220v Welder Plug
Wiring a 220v welder plug requires careful attention to safety precautions to prevent accidents and ensure a successful wiring process. Here are some critical safety measures you should take before and during the wiring process:
-
Turn off the power supply: Before you start wiring the plug, ensure that the power supply is turned off. This means that you should unplug the welder from the power source or turn off the circuit breaker that supplies power to the outlet.
-
Wear protective gear: When working on the wiring, it is advisable to wear protective gear such as gloves, safety glasses, and a face shield. This will protect you from any sparks or electrical shocks that may occur during the process.
-
Choose the right wire size: Ensure that you choose the right wire size for the plug. Using the wrong wire size can lead to overheating, which can cause a fire or damage to the welder.
-
Use the right tools: Use the right tools for the job, such as wire strippers, crimping tools, and pliers. Using the wrong tools can damage the wires or the plug, which can lead to electrical shocks or fires.
-
Follow the wiring diagram: Always follow the wiring diagram for the plug. This will ensure that the wires are connected correctly and that the plug is wired safely.
Step-by-Step Wiring Instructions
Step 1: Prep the Cable
Strip the outer jacket of your cable back about 1.5 inches. Strip 1/2 inch of insulation off the Black and White wires.
Step 2: Identify the Terminals
Open your NEMA 6-50 plug housing. You will see three terminals. The one connected to the U-shaped pin is Ground. The two connected to the flat blades are Hot.
Step 3: Connect Ground First
Always connect the Green/Bare wire to the Green screw first. This ensures you have safety grounding established before handling hot wires.
Step 4: Connect the Hots
Connect the Black wire to one brass screw. Connect the White wire (marked with tape) to the other brass screw. It does not matter which brass screw receives which color—both are 120V hot lines that combine to make 240V.
Diagram: 3 Wire 220v Welder Plug Wiring
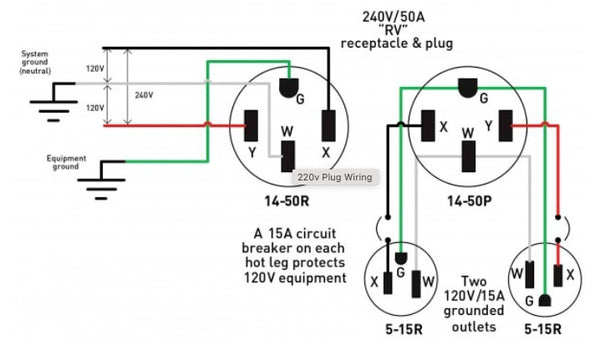
Photo grab from: https://www.tankbig.com/220v-welder-plug/
If you're planning to wire a 3 wire 220v welder plug, it's important to have a clear understanding of the wiring diagram to ensure a safe and proper installation. In this section, we'll go over how to read the wiring diagram and identify wire connections.
Reading the Wiring Diagram
The wiring diagram for a 3 wire 220v welder plug will typically consist of three wires: a black, a white, and a green wire. The black wire is the hot wire, the white wire is the neutral wire, and the green wire is the ground wire.
When reading the wiring diagram, it's important to pay attention to the wire colors and their corresponding connections.
The black wire will typically connect to the brass-colored terminal, the white wire will connect to the silver-colored terminal, and the green wire will connect to the green-colored terminal.
Identifying Wire Connections
To identify the wire connections, you'll need to strip the wires and connect them to the appropriate terminals. Start by stripping about 3/4 inch of insulation from the end of each wire.
Next, connect the black wire to the brass-colored terminal, the white wire to the silver-colored terminal, and the green wire to the green-colored terminal. Tighten the terminal screws securely to ensure a good connection.
In conclusion, wiring a 3 wire 220v welder plug can be done safely and easily by following the wiring diagram and properly identifying wire connections.
By taking the time to understand the wiring diagram and ensuring a proper installation, you can ensure a safe and reliable power supply for your welder.
Diagram 3 Prong Plug Wiring Colors
When wiring a 3 prong plug, the colors and their connections are usually:
-
Green or Bare Wire: This is the ground wire. It connects to the green screw.
-
White Wire: This is the neutral wire. It connects to the silver screw.
-
Black Wire: This is the hot or live wire. It connects to the brass or gold screw.
Tip: Always double-check your plug and local wiring codes before starting. Make sure the plug is unplugged before you work on it for safety.
Troubleshooting Common Issues in 220v Welder Plug Wiring
Wiring a 220v welder plug can be a straightforward process, but sometimes issues can arise. Here are some common problems that might occur during the wiring process and practical solutions to help you troubleshoot them.
Issue 1: Incorrect Wire Gauge
One of the most common issues when wiring a 220v welder plug is using the incorrect wire gauge. If you use a wire gauge that is too small, it may not be able to handle the current required by your welder, which can lead to overheating and a potential fire hazard.
Solution: Make sure to use the correct wire gauge for your welder plug. Generally, a 10 or 8 gauge wire is recommended for a 220v welder plug. You can refer to your welder's manual or consult with an electrician to determine the appropriate wire gauge for your specific needs.
Issue 2: Loose Connections
Another common issue that can occur during the wiring process is loose connections. If the connections are not properly secured, they can come loose over time, which can cause the plug to fail or create a fire hazard.
Solution: Make sure to properly tighten all connections when wiring your 220v welder plug. Use pliers or a screwdriver to ensure that all screws and connectors are securely fastened.
Issue 3: Grounding Problems
Grounding problems can also occur during the wiring process. If the ground wire is not properly connected, it can create a safety hazard by allowing electrical current to flow through the metal parts of the welder.
Solution: Make sure to properly connect the ground wire to the welder plug. The ground wire should be connected to the green screw on the plug and to the metal frame of the welder. Use a wire stripper to remove the insulation from the end of the ground wire and secure it in place using a connector screw.
Issue 4: Insufficient Power
If your welder is not receiving sufficient power, it may not work properly or may not work at all. This can be caused by a variety of factors, including using the wrong wire gauge or not having the correct voltage.
Solution: Make sure to use the correct wire gauge for your welder plug and ensure that you have the correct voltage. If you are unsure about the voltage requirements for your welder, consult the manufacturer's manual or speak with an electrician.
Testing and Verifying Your 220v Welder Plug Connection
After you have wired your 220v welder plug, it is important to test and verify that the connection is wired correctly and is operational. This will ensure that you can use your welder safely and effectively.
To test your 220v welder plug connection, follow these steps:
-
Turn off the power supply to the outlet where you have installed the plug. Use a voltage tester to ensure that there is no current running through the wires before proceeding.
-
Connect the voltage tester to the two hot wires of the plug. The voltage tester should read 220v if the connection is wired correctly.
-
If the voltage tester does not read 220v, turn off the power supply and recheck your wiring. Ensure that the wires are connected to the correct terminals and that there are no loose connections.
-
Once you have verified that the voltage tester reads 220v, turn on the power supply to the outlet. Use the voltage tester again to ensure that there is no voltage drop when the welder is in use.
- If there is a voltage drop, it may indicate that the wiring is not sufficient for the power requirements of your welder. You may need to upgrade your wiring or consult a professional electrician for assistance.
Conclusion
In conclusion, wiring a 3-wire 220V welder plug is a crucial task that requires attention to detail and adherence to safety guidelines. It is essential to choose the right wire gauge, strip the ends of the wires, and terminate them correctly.
As discussed earlier, safety should always be a top priority when working with electrical systems. Before beginning any electrical work, it is crucial to prioritize safety.
Make sure the power is turned off completely and use a voltage tester to ensure there is no current running through the wires.
Following the steps outlined in this guide accurately will ensure that the wiring is done safely and efficiently. It is important to note that using the wrong wire gauge or incorrect termination methods can result in electrical hazards, including fire and electrocution.
Discover top-notch 220V Welders at ArcCaptain, your go-to store for the best selection of high-quality welding equipment. Explore our best-sellers now!
Frequently Asked Questions
How Do You Wire a 220 Plug With 3 Wires?
Wiring a 220 plug with three wires is a simple process that requires some basic electrical knowledge and a few tools. First, you need to choose the right wire gauge for the plug. For a 220-volt plug, you can use either a 10-gauge or an 8-gauge wire, depending on the power requirements of your welder. Next, you need to connect the wires to the appropriate terminals on the plug. The black and red wires are connected to the two hot terminals, while the green wire is connected to the ground terminal. Make sure to tighten the terminal screws securely to ensure a safe and reliable connection.
Does a 240v Welder Need a Neutral?
Unlike a 120-volt circuit, a 240-volt circuit does not require a neutral wire. This is because a 240-volt circuit is a two-wire circuit that consists of two hot wires and a ground wire. The hot wires are 180 degrees out of phase, which means that they alternate between positive and negative voltage. This allows the welder to draw power from both hot wires, which provides a higher voltage and more power than a 120 volt circuit.
What Wire Do I Need for 220 Welder Outlet?
The wire you need for a 220 welder outlet depends on the power requirements of your welder. For most 220 volt welders, you can use either a 10 gauge or an 8 gauge wire, depending on the length of the wire run and the amperage rating of the welder. It is important to choose the right wire gauge to ensure that the wire can handle the current without overheating or causing a fire.
What Wire Do I Need for 220v 30 Amp?
For a 220 volt 30 amp circuit, you will need to use a 10 gauge wire. This wire is capable of handling up to 30 amps of current, which is sufficient for most 220 volt welders. It is important to choose the right wire gauge to ensure that the wire can handle the current without overheating or causing a fire.


