Knowing how to measure wire gauge is one of those simple but essential skills that can save you time, money, and frustration.
Whether you’re wiring a home, setting up a car stereo, or working on a DIY project, understanding wire sizes ensures your connections are safe and efficient.
Want to learn how to do it the right way? Read on to discover everything you need to know about measuring wire gauge, step by step.
What Is Wire Gauge and Why It Matters
Wire gauge refers to the thickness or diameter of a wire. The smaller the gauge number, the thicker the wire. For example, 10‑gauge wire is thicker and carries more current than 16‑gauge wire.
This matters because the wire size affects how much electricity it can safely handle. Using the wrong gauge can lead to overheating, voltage drop, or even electrical hazards.
In most homes:
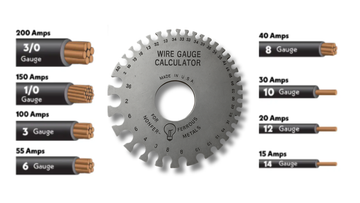
- 12‑gauge wire is used for outlets and appliances (20 amps).
- 14‑gauge wire is used for lighting circuits (15 amps).
The National Electrical Code (NEC) provides official ampacity guidelines in Table 310.16. Always follow local electrical codes when choosing wire size to ensure safety and compliance.
Understanding Wire Gauge Systems (AWG, SWG, and Metric Sizes)

Before learning how to measure wire gauge, it helps to know that not all systems are the same. The American Wire Gauge (AWG) system is used in the United States, while Standard Wire Gauge (SWG) is common in the UK.
In many other countries, wire thickness is measured in millimeters (mm²).
Here’s a quick comparison of common wire sizes across systems:
- 2.5 mm wire ≈ 13 AWG
- 1.2 mm wire ≈ 17 AWG
- 4 AWG wire ≈ 5.19 mm thick
If you work with international equipment or wiring, always double‑check which system is being used. Mixing them up can lead to incorrect wire sizing and potential safety issues.
Tools You’ll Need to Measure Wire Gauge
To measure wire gauge accurately, you’ll need a few basic tools. Each one helps you find the wire’s diameter or match it to a known size.
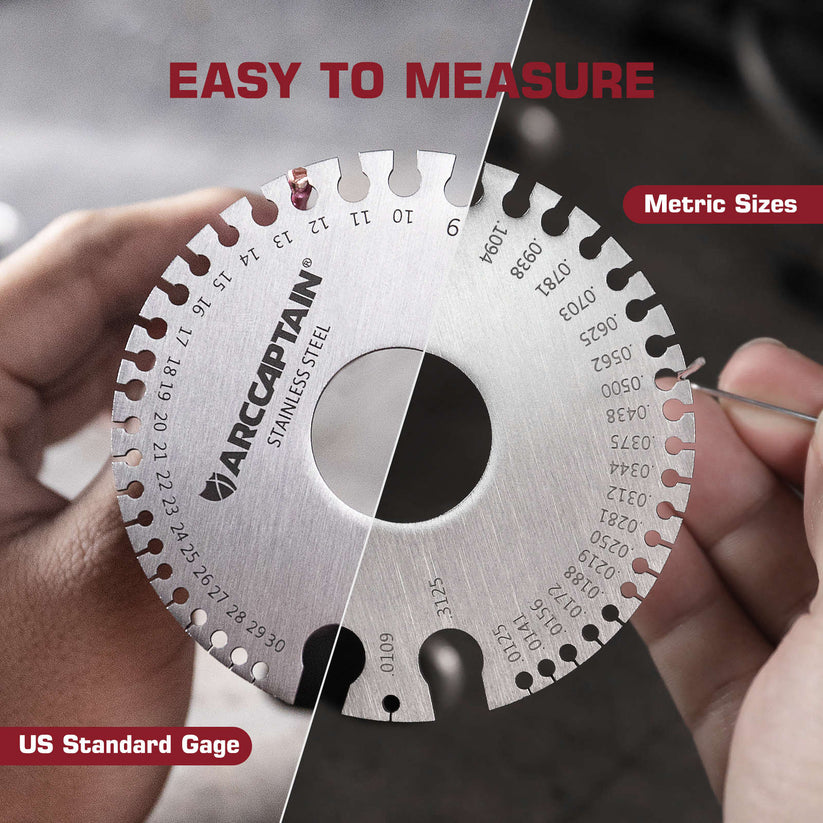
- Wire Gauge Tool: A metal plate with labeled slots. Insert the wire into each slot until it fits perfectly.
- Caliper or Micrometer: Measures the wire’s diameter in millimeters or inches for precise results.
- Wire Stripping Tool: Removes insulation cleanly without damaging the wire.
- Wire Gauge Chart: Helps you compare your measurements to standard AWG or metric sizes.
Check Related Products

📌 If you’re working with welding wires, check out MIG Wire Sizes: How to Choose the Right Wire for Welding Projects to understand how wire gauge affects welding performance.
How to Measure Wire Gauge (Step‑by‑Step Guide)
Learning how to measure wire gauge is simple once you know the process. Follow these steps to get accurate results every time.
Step 1: Prepare the Wire
Start by removing the insulation from the wire. You want to measure the bare metal, not the plastic coating.
Use a wire stripper to cleanly remove about an inch of insulation, then straighten the exposed wire so you can measure it easily.
Step 2: Use a Wire Gauge Tool
- Slide the wire into the slots of the wire gauge tool one by one.
- When the wire fits snugly without gaps or force, note the number next to that slot.
- That number is your wire gauge.
This method is quick, accurate, and works for most solid and stranded wires.
Step 3: Measure Without a Wire Gauge Tool
If you don’t have a wire gauge tool, you can still measure:
- Use a caliper or ruler to measure the diameter of the bare wire in millimeters.
- Compare your measurement to a wire gauge chart to find the matching AWG size.
For example, a wire with a 2.05 mm diameter is roughly 12 AWG.
Step 4: Verify Using a Wire Gauge Chart
Once you have your measurement, double‑check it against a reliable wire gauge chart. This ensures you’re using the correct size for your project.
📌 If you often work on welding or electrical projects, read How to MIG Weld Different Metal Thicknesses: Complete Guide for Beginners to see how wire gauge and metal thickness work together for strong welds.
How to Tell the Difference Between Common Wire Gauges

Sometimes you can identify wire gauge just by looking at it, especially for common sizes like 12, 14, or 16 AWG.
Here’s a quick visual guide:
- 12‑gauge wire: Thicker, used for outlets and appliances.
- 14‑gauge wire: Slightly thinner, used for lighting.
- 16‑gauge wire: Even thinner, used for low‑power devices.
Note: Insulation color does not indicate wire size. In U.S. wiring, colors show function:
- White or gray = neutral
- Green or bare copper = ground
- Black or red = hot
📌 For more on how bending and shaping metals affect their size and strength, check out Bend Allowance Formula: How to Calculate Accurate Bends in Metal Fabrication.
Best Practices for Accurate Wire Gauge Measurement
When learning how to measure wire gauge, a few small habits can make a big difference:
- Test multiple sections of the same wire to confirm consistent thickness.
- Use the right tool for the wire type (solid or stranded).
- Twist stranded wires tightly together before measuring to get a more accurate reading.
- Remove insulation completely before taking measurements.
- Check regional standards to confirm if you’re using AWG, SWG, or metric sizes.
Following these tips ensures your measurements are precise and reliable.
Common Mistakes to Avoid When Measuring Wire Gauge
Avoid these common errors when measuring wire gauge:
- Measuring the wire with insulation still on.
- Assuming wire color equals gauge size.
- Using the wrong chart (AWG vs SWG).
- Forgetting to check stranded vs solid wire differences.
Even small mistakes can lead to electrical issues or safety hazards, so always double‑check your process.
Wire Gauge Reference Chart (AWG to mm Conversion and Ampacity)
Here’s a quick reference to help you convert between AWG and millimeters, including maximum current ratings for copper wires per NEC Table 310.16 (at 60°C insulation):
|
AWG |
Diameter (mm) |
Typical Use |
Max Current (Copper, 60°C) |
|---|---|---|---|
|
10 |
2.59 mm |
Heavy appliances |
30 amps |
|
12 |
2.05 mm |
Outlets, small motors |
20 amps |
|
14 |
1.63 mm |
Lighting circuits |
15 amps |
|
16 |
1.29 mm |
Low‑power devices |
10 amps |
|
18 |
1.02 mm |
Electronics |
7 amps |
|
20 |
0.81 mm |
Signal wiring |
5 amps |
Keep this chart handy for quick checks whenever you need to identify or compare wire sizes.
Conclusion
Measuring wire gauge is simple once you know what to look for. With the right tools, a clear chart, and a few careful steps, you can confidently identify any wire size. This helps ensure your projects are safe, efficient, and built to last.
For more helpful guides and tips about how to measure wire gauge and other welding‑related topics, visit ArcCaptain. They offer expert advice plus high‑quality welding machines, tools, gears and accessories for every project.
Whether you’re a beginner or a pro, ArcCaptain has everything you need to get the job done right.
Frequently Asked Questions
How do I know what size wire I need?
The right wire size depends on how much current your circuit or device uses. Larger currents require thicker wires (lower gauge numbers). Always check your project’s specifications or local electrical codes to choose the correct wire size for safety.
How to identify cable size?
You can identify cable size by checking printed markings on the insulation or by measuring the wire’s diameter. Once measured, compare it to a wire gauge chart. This helps ensure you’re using the correct cable for your project.
How to calculate wire length for house wiring?
To calculate wire length, measure the total distance between your power source and the device, including turns or bends. Add a little extra length for flexibility and connections. Using the correct wire gauge for that length prevents voltage drop and keeps your system efficient.
Can you tell me what a wire gauge tool is used for?
A wire gauge tool is used to measure the thickness of a wire quickly. It has labeled slots for different gauges, allowing you to match your wire to the correct size. It’s one of the easiest and most accurate ways to determine wire gauge.