Want to start welding from home and learn how to join metals with confidence? Kickstarting your welding journey requires just the basics, and with the right equipment, you can create durable metalworks and save on costs.
Welding at your own place doesn't have to be complicated. With the necessary tools, you can start making metal bonds that are strong and permanent. This upfront investment in equipment could save you money in the long run because you won't need to buy things that you can now make or fix yourself.
Your basic welding kit should include items like a torch, cables, and a regulator. If you're new to welding, you might find a MIG welder the easiest to use.
Setting up your welding space is also important. Choose an area with plenty of fresh air and a safe surface to prevent fires.
Get to know the different metals you can work with and the welding techniques available. Start with easy projects to improve your skills. With some practice and the right preparations, welding at home is both enjoyable and useful.
Ready to light up your welding journey and build things with your own two hands? Keep reading, and let's get started!
How To Set Up Your Welding Space At Home
Creating a safe and efficient welding space at home requires attention to electrical safety, proper gas handling, and ventilation. Keeping these factors in check ensures that you can weld from home effectively.
1. Electrical Requirements and Safety

For welding at home, you need to ensure your power source can handle the electricity demands of welding equipment.
Residential electrical outlets often provide either 110V or 220V, but welders can require 220V for continuous operation without tripping breakers.
It's essential to:
- Check your welder's voltage requirements and compare them with your home's electrical setup.
- Employ a dedicated circuit to avoid overloading and ensure the safety of your electrical system.
Consider hiring a licensed electrician to install a 220V outlet if necessary. Always double-check:
Circuit breakers: Ensure they match the required amperage for your welder.
Grounding: Confirm that your welder is adequately grounded to prevent electrical accidents.
Extension cords: Use heavy-duty, welder-specified extension cords if needed.
2. Gas and Ventilation Systems

Ventilation is crucial when setting up your welding space. Welding produces fumes that can be hazardous to your health.
Effective ventilation systems can be as simple as:
- Opening windows and doors to ensure cross-ventilation.
- Using exhaust fans to draw fumes away from your breathing zone.
When dealing with gases, particularly shielding or inert gases commonly used in welding, it's critical to:
- Store shielding gas cylinders upright and secured to prevent tipping.
- Check for leaks routinely by applying a soapy water solution to connections and looking for bubbles.
- Keep gases in well-ventilated areas, away from direct heat sources and electrical equipment.
How To Choose Your Welding Equipment
Before you start to weld at home, it's important to understand the different types of welding processes and select the right equipment that suits your specific needs.
Different Types of Welding
Electric Arc Welding: This common form of welding utilizes an electric arc to generate heat. The core types include:
- Stick Welding (Shielded Metal Arc Welding or SMAW): Uses an electrode stick that creates the arc. Good for outdoor use and thicker materials.
- MIG Welding (Metal Inert Gas Welding): Involves a wire feeding mechanism that makes it easier to use, suitable for beginners, and provides cleaner welds.
- TIG Welding (Tungsten Inert Gas Welding): Uses a non-consumable tungsten electrode. It is precise, good for thinner metals and high-quality welds.
- Flux-Core Welding: Similar to MIG but doesn't require a shielding gas.
Selecting the Right Welder
When you decide to weld from home, choosing the right welder is crucial. Here's a simplified guide to help you:
Stick Welders:
- Pros: Portable, inexpensive, and effective on dirty or rusty metals.
- Cons: Harder to learn and slower than other methods.
MIG Welders:
- Pros: Easy to learn, works well on thin materials, and allows for a clean weld.
- Cons: Can be costlier due to gas and equipment, not ideal for windy conditions.
TIG Welders:
- Pros: Precision and control, excellent for cosmetic welds.
- Cons: Higher skill required and generally more expensive equipment.
Flux-Core Welders:
- Pros: No need for a shielding gas, and can work well in all positions and environments.
- Cons: Produces a lot of spatter and typically a rougher weld surface.
When welding at home, consider your budget but remember, a cheap welder might not always serve you well in the long term. Quality and features should guide your purchase more than just price.
Each type of welding machine has its own learning curve, so factor in your current skill level and willingness to learn new techniques.
How To Choose Your Welding Safety Gear
When you begin to weld at home, prioritizing safety ensures protection against high heat, sparks, and harmful light. Your personal protective equipment acts as the first line of defense in your home welding projects.
Essential Protective Wear
Welding Helmet: Your eyes and face require shielding from intense light and flying debris. An auto-darkening helmet adjusts to different lighting conditions to protect your vision while allowing you to see your work clearly.
Welding Gloves: These are essential and should be made of flame-resistant materials to handle high heat and spatter.
Heavy-duty gloves are recommended for stick welding, whereas MIG welding gloves offer more dexterity.
Welding Jacket: To protect your skin from burns and UV exposure, wear a welding jacket. Look for jackets with flame-resistant fabrics.
Work Boots: Durable leather work boots can prevent foot injuries and offer protection from electrical hazards.
Additional Safety Equipment
Apart from the essential gear, other safety items include:
- Fire Extinguisher: Keep one near your workspace to handle any potential fires.
- First Aid Kit: For immediate treatment of any minor injuries.
- Fume Extraction: Good ventilation or a fume extractor is crucial to keep the air clean from hazardous welding fumes.
Pre- and Post-Welding Procedures
Whether you're new to the weld at home lifestyle or an experienced artisan weld from home, proper preparation and finishing are pivotal to the quality and longevity of your welds. The following lays out the specifics to get your materials ready and the techniques to finish your welds like a pro.
Preparing Your Materials
Before welding at home, your materials must be prepped scrupulously to ensure a clean, strong weld. Begin with:
- Cleaning: Any foreign materials (rust, paint, oil) on your metal can contaminate the weld. Use a brush or chemical solvent suitable for your metal type.
- Cutting and Fitting: A proper fit is crucial. Utilize cutting tools to shape your metal to the necessary size, and then employ miter clamps or magnet squares to hold the pieces firmly together.
- Beveling Edges: A chamfer or bevel allows for deeper penetration of the weld. Use a grinder to bevel the edges, if required, by your weld job.
- Setting Up Your Welder: Choose the appropriate electrode or wire, and set your welding machine to the proper settings for the metal type and thickness.
Finishing Your Welds
After completing your weld, focus on these finishing techniques:
- Clean Up Slag: If you used a technique involving flux, like SMAW, chipping away the residual slag with a chipping hammer is essential for inspecting the weld.
- Grinding: In cases where a flush surface is desired, use an angle grinder to smooth down the weld.
- Always wear appropriate safety gear, such as a face shield and gloves. A light touch assures you don’t weaken the weld by removing too much material.
- Inspection: Finally, inspect the weld. Look for uniformity and any signs of defects like cracks or inclusions that could lead to weld failure.
Advancing Your Welding Skills
To effectively weld from home, enhancing your welding skills is essential. Mastery in various techniques and a deep understanding of metals pave the way for proficient and safe welding practice.
Practicing Different Welding Techniques
Welding involves a range of techniques essential to various projects.
Stick welding is robust, ideal for thick materials, and highly suitable for outdoor work. For a more controlled and clean weld, especially on metals like aluminum and stainless steel, you might opt for TIG welding.
MIG welding is user-friendly and versatile, perfect for a quick weld at home on materials like mild steel, aluminum, or stainless steel.
To improve, regularly work on various welding beads; practice tack welding for positioning before the final weld beads; and try layering your weld to reinforce strength.
- Stick (Arc) Welding: Suitable for heavier materials; requires electrode and consistent hand movement.
- TIG (GTAW) Welding: Detailed welds; involves using a non-consumable tungsten electrode.
- MIG (GMAW) Welding: Good for beginners; uses a wire feeding gun and is effective for thinner materials.
Understanding Metals and Weld Types
Your welding projects require knowledge of different metals and their respective weld types.
Sheet metal, usually made of mild steel, aluminum, or stainless steel, demands precision and can be susceptible to warping if overheated.
In comparison, working with angle iron might involve creating butt welds to connect pieces in a straight line.
When welding at home, recognizing the right approach for mild steel versus thicker materials is crucial for project success.
- Aluminum: Requires high heat and often a TIG setup due to its heat-conducting properties.
- Mild Steel: Versatile and forgiving, ideal for practice with MIG welding.
- Stainless Steel: Calls for careful heat control to prevent warping and maintain appearance.
Learn more by reading our guide: Different Types of Metal Used in Welding
Conclusion
Welding from home unlocks a world of DIY possibilities, allowing you to merge creativity with practical skills. With the basics in hand, your journey from welding novice to home repair hero begins.
So as you gear up to join the ranks of home welding enthusiasts, consider Arc Captain for equipment that will not only meet your needs but also exceed your expectations. Welding from home is an adventure that begins with a single spark, and Arc Captain's products ensure that every weld is a step towards mastering the craft.
Arc Captain offers a variety of welding products that combine quality with ease of use—perfect for any project you're planning. Check out our products and start welding with confidence!
Frequently Asked Questions
Can I weld in my garage?
Yes, you can weld in your garage, provided you have taken the necessary safety precautions. Ensure the area is well-ventilated to avoid the accumulation of toxic fumes, and that there are no flammable materials nearby. It's also important to have a fire extinguisher on hand in case of emergencies.
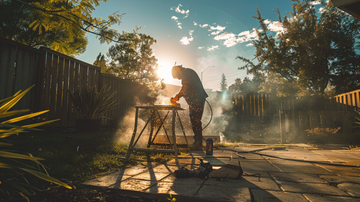
Can I weld in my backyard?
Welding in your backyard is possible and can be ideal due to natural ventilation. However, you should still be cautious of your surroundings, making sure that the welding area is clear of dry leaves or other combustibles. Also, keep in mind weather conditions such as wind, which could blow sparks and create a fire hazard.
What is the best DIY welding method?
For DIY enthusiasts, MIG (Metal Inert Gas) welding is often regarded as the best method to start with. It's user-friendly, versatile, and allows for cleaner welds compared to some other methods. MIG welders are great for a variety of projects and materials, which makes them suitable for many home welding applications.
What welder can I plug in at home?
Most home outlets can accommodate a 110V welder, which is suitable for light to medium-duty welding tasks. However, for more power and continuous use, you may need a 220V outlet. Many modern welders come with dual voltage capability, allowing you to plug them into either type of outlet with the proper adaptor.
Can you make a living as a welder?
Absolutely, welding can be a lucrative career with various opportunities across different industries such as construction, manufacturing, and automotive repair. Professional welders can work for companies or start their own welding businesses. With specialized skills and certifications, welders can command high salaries and job security.
Is welding self-taught?
While welding can be self-taught through resources like books, online tutorials, and practice, formal training is highly recommended. Attending courses at a technical school or community college can provide hands-on experience and a deeper understanding of the trade, safety procedures, and technical skills required for more complex jobs.


