Struggling to get the perfect weld? A stick welder settings chart is your shortcut to better, cleaner, and stronger welds.
With the right chart, you can easily match your amperage, rod size, and metal thickness for any project. No more guessing or wasted metal, just reliable results every time.
Ready to boost your welding skills and confidence? Read on for practical tips and an easy-to-follow stick welder settings chart.
What Is Stick Welding and Why Settings Matter
Stick welding, also called Shielded Metal Arc Welding (SMAW), is one of the most popular ways to join metal. It uses a stick-shaped electrode and an electric current to melt and fuse metal pieces together.
Getting the settings right is important. Too much amperage burns holes in your metal. Too little, and your welds are weak and lumpy.
The right settings depend on the rod you use, the metal thickness, and your welding position.
If you want to know more about the basics, check out our complete stick welding guide.
What Affects Your Stick Welder Settings

Several factors influence your stick welder settings, from the type of electrode to the thickness of your metal. Understanding these factors will help you achieve the best welds for every project.
Electrode Type and Size
Different electrodes (welding rods) need different settings. Common rods like 6010, 6011, 6013, and 7018 all have their own sweet spots for amperage and polarity. The size of the rod matters too. A thicker rod needs more amps.
Want to compare the most popular stick welding rods? Browse our electrode comparison guide.
Metal Thickness and Type
Thicker metals need more amps to get good penetration. Thin metals can burn through if you crank the amps too high. The type of metal, like mild steel, stainless, or cast iron, also changes your settings.
Curious about welding different metals with a stick welder? Check out our guide to stick welding different metals.
Welding Position
Welding flat, vertical, or overhead changes how the weld pool behaves. Overhead and vertical welds usually need a little less amperage to keep the molten metal from dripping.
Machine Type and Power Source
Some stick welders only run on AC, while others let you choose DC+. Your machine’s maximum output limits the size of rods you can use.
Stick Welder Settings Chart
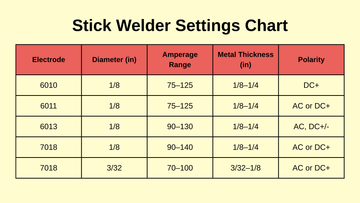
A stick welder settings chart gives you a quick reference for the most common electrodes and metal thicknesses. Use this chart as a starting point and adjust based on your actual welding results.

- For metal thinner than 1/8", use a smaller rod (3/32") and start at the low end of the amp range.
- For thicker metal, use a larger rod (5/32" or 3/16") and increase amps as needed.
How to Use a Stick Welder Settings Chart
Using a stick welder settings chart is easy and can save you a lot of trial and error. Follow these simple steps to get started with the right settings for your project.
- Pick your electrode based on the job and metal type.
- Find the rod size that matches your metal thickness.
- Set your amperage in the recommended range from the chart.
- Choose the right polarity for your rod and machine.
- Run a test weld on scrap metal. If the arc is too harsh or the rod sticks, adjust your amps up or down.
If your weld is tall and lumpy, turn the amps up a bit. If it’s flat or you’re burning holes, turn it down. The chart is a guide. Your eyes and ears are the final judge.
Amperage Settings for Common Welding Rods
Knowing the right amperage for each welding rod helps you get smooth, strong welds every time. Here are the recommended amp ranges for the most popular stick welding rods.
6010 Welding Rod
- 3/32" rod: 40–85 amps
- 1/8" rod: 75–125 amps
- 5/32" rod: 110–160 amps
6011 Welding Rod
- 3/32" rod: 40–90 amps
- 1/8" rod: 75–125 amps
- 5/32" rod: 110–160 amps
6013 Welding Rod
- 3/32" rod: 40–90 amps
- 1/8" rod: 90–130 amps
- 5/32" rod: 120–180 amps
7018 Welding Rod
- 3/32" rod: 70–100 amps
- 1/8" rod: 90–140 amps
- 5/32" rod: 110–165 amps
Tip: The thicker the rod, the higher the amps you’ll need. Always start at the lower end of the range and increase as needed.
Adjusting Stick Welder Settings for Different Metal Thicknesses

Matching your welder settings to the thickness of your metal is key for good results. Use this table to help choose the right electrode size and amperage for different metal thicknesses.
|
Metal Thickness (in) |
Electrode Size |
Amperage Range |
|
1/16 – 1/8 |
3/32" |
40–90 |
|
1/8 – 1/4 |
1/8" |
75–140 |
|
1/4 – 3/8 |
5/32" |
110–180 |
If your welds are sitting on top of the metal, increase your amps. If you’re blowing holes, decrease your amps or use a smaller rod.
Stick Welder Polarity Settings Explained
Choosing the correct polarity for your electrode is important for arc stability and penetration. Here’s a quick overview to help you select the right polarity for your welding rod and machine.
- DC+ (DCEP): Best for most rods like 7018 and 6010. Gives deep penetration and a stable arc.
- DC- (DCEN): Used for some special rods and thin metal.
- AC: Good for 6011 and 6013 rods, especially on basic AC welders.
|
Electrode |
Best Polarity |
|
6010 |
DC+ |
|
6011 |
AC or DC+ |
|
6013 |
AC, DC+, DC- |
|
7018 |
AC or DC+ |
If your machine only does AC, stick with 6011 or 6013 rods for best results.
Quick Reference: Stick Welder Settings for Beginners
If you’re new to stick welding, start with these basic settings for common welding jobs. They’ll help you get good results on mild steel, sheet metal, or heavy steel.
- Mild steel, 1/8" thick: 1/8" 6011 or 7018 rod, 100–120 amps, DC+ or AC
- Sheet metal, 1/16" thick: 3/32" 6013 rod, 50–70 amps, AC or DC-
- Heavy steel, 1/4" thick: 1/8" or 5/32" 7018 rod, 120–160 amps, DC+
Safety Tips:
- Always wear a welding helmet and gloves.
- Keep your work area dry and free of clutter.
- Make sure your ground clamp is secure.
Mistakes to Avoid:
- Don’t crank the amps too high just to be safe.
- Don’t use a huge rod for thin metal.
- Don’t forget to clean your metal before welding.
Looking for a new stick welder for your next project? Check out our expert recommendations for top stick welders in 2025.
Conclusion
Using a stick welder settings chart helps you achieve strong, neat welds with less frustration. With just a little practice and the right guidance, you’ll handle any welding job with confidence.
For more stick welding guides and tips, visit ArcCaptain. Also, don’t forget to browse and shop ArcCaptain’s selection of stick welding machines to upgrade your welding setup today.
Frequently Asked Questions About Stick Welding Settings Chart
What should my stick welder be set at?
Your stick welder should be set according to the electrode type, size, and the thickness of the metal you’re welding. Start with the recommended amperage from the stick welder settings chart, making sure to match the polarity as well. Always run a test weld on scrap metal first, then adjust your settings up or down based on the arc stability and weld appearance.
What amps to run 7018 on?
For a 1/8" 7018 rod, you should use between 90 and 140 amps, while a 3/32" rod typically runs best at 70 to 100 amps. It’s important to adjust within this range depending on your welding position and the thickness of the metal. Begin at the lower end, observe the weld, and increase amperage as needed for proper penetration and bead shape.
How to know what amperage to use when stick welding?
Check the stick welder settings chart for your specific rod size and the thickness of your metal to find a good starting point. Begin welding at the low end of the recommended range and watch how the electrode behaves and how the weld looks. If the arc is hard to start or the weld sits high, increase the amps; if you get burn-through or excessive spatter, decrease the amps.
How do you set up a welder for stick welding?
First, connect your ground clamp securely to clean, bare metal, and insert the correct electrode for your project. Set your welder to the recommended amperage and polarity based on your chosen rod and metal thickness. Double-check all connections, put on your safety gear, and always run a test bead on scrap before starting your main weld to fine-tune your settings.
What is the best setting for a 7018 welding rod?
The best setting for a 7018 rod depends on the rod’s diameter and your specific welding application. For most jobs with a 1/8" 7018, set your welder between 100 and 130 amps using DC+ or AC polarity, adjusting slightly higher or lower as needed. Observe the arc and weld bead, and fine-tune your settings to achieve smooth, even welds with good penetration.
What is the rule of thumb for stick welding amperage?
A common rule of thumb is to use about 1 amp per thousandth of electrode diameter, so a 1/8" (0.125") rod would be set at roughly 125 amps. This guideline gives you a reliable starting point, but you should always refer to a stick welder settings chart for more precise recommendations. Adjust your amperage based on your actual welding results, the metal thickness, and your welding position.